
Ever feel like one of those wacky, inflatable, arm-flailing tube people when you’re on-skates? Maybe it’s just when you have to travel a long distance laterally across the track. Or maybe it’s only when you’re hit unawares. Maybe it’s all the time.
And maybe you’ve noticed that even as you get more comfortable on skates and your skill level increases: YOU STILL HAVE MOMENTS OF BEING WILDLY OUT OF CONTROL.
Chances are good that tuning into your core muscles can help.
BUT…we hear the words “engage your core” so often at practice or in training or in the gym that maybe they’ve lost their meaning.
- Pray tell, what are these muscles you speak of?
- How am I to engage upon them in a meaningful way?
- Of what import will this have upon my skating?
If you’re wondering that, this blog post is for you.
Your core muscles AREN’T the ones you can see or touch just under your skin. The core muscles that make the most difference to your skating are the DEEP ones. The ones underneath the ones every talks about. Not your abs, not your obliques. Those other ones.
These core muscles are wrapped around your middle like a corset. And like a corset, they provide support and structure for your movement.
Think of them as a transfer station. To get power from your legs to your shoulders, that force has to travel through your core. If your core is too weak, too relaxed, or too disconnected, that force won’t transfer as cleanly as you want/need it to.
That means less power in your pushes. Less speed behind your lateral movement. And less force into the ground when you’re trying to stop. (Oh, and some wildly flailing arms and upper bodies…)
Your core muscles create a canister that supports the center or your body and determines how force moves between the upper and lower parts. (As well as other important stuff, like keeping you from peeing your pants.)
The remainder of this admittedly long blog will do the following:
- Introduce you to your main core (canister) muscles
- Link to Facebook Live videos about each one (like the one above, for more detail, if that’s what you’re into)
- Provide exercises and drills to strengthen and engage the main core canister muscles
This blog isn’t meant to be completely comprehensive. There’s too much info for that! But my hope is that it gives you a good starting point for testing the engagement and activation of your main core muscles and some ways to start creating a more effective and efficient transfer station for all your skating power.
1. DIAPHRAGM
The top of your canister. Yes, your diaphragm is a muscle. And your diaphragm has primary control over the pressure inside your abdomen. This is the muscle that moves up and down as you exhale/inhale creating changes in space in your lung cavity and your abdomen.
If you’ve ever seen a powerlifter take a huge breath and hold it while doing a big lift, it’s because of this. They want A LOT of pressure to support that weight while they lift it. Creating pressure in your abdomen like that isn’t a BAD thing, but it’s not ideal for someone moving in a more dynamic way.
Think about it this way:
A powerlifter has a very limited range of motion they are moving through AND they aren’t trying to move their limbs in opposing directions while they are doing it. When you play a more dynamic sport, you need to be able to maintain appropriate pressure in your abdomen WITHOUT holding your breath WHILE moving your arms and legs with control.
If you’re doing all the planks and posterior chain work you can do to strengthen your core, but neglect breathing — YOU HAVE WORK TO DO. Learning to connect your breathing to your diaphragm (and, ultimately, your pelvic floor) is the best way to start learning how to engage your core and create pressure when and where you need it.
You can learn more about practicing core connection breaths in the video from Girls Gone Strong below and every single athlete can benefit from it.
Seriously, though. If breathing is not a current part of your warm-up OR something you think about as you lift, you need to start making it a priority.
2. PELVIC FLOOR
The bottom of your canister. And some of the hardest working muscles you have. Your pelvic floor helps to control pressure in the abdomen. It also supports the weight of your internal organs and has a large part in controlling your bladder and bowels.
Problems can arise from your pelvic floor when it’s “too loose.” But it’s equally common to have problems when you OVERBRACE your pelvic floor and hold it in constant contraction. This is another reason why proper, focused breathing is key for core function and strength.
Honestly, the pelvic floor could really us an entire blog entry all it’s own. So you should take a teeny, tiny pause here and go READ THIS.
The main key with the pelvic floor is to think about it as kind of an extension of your diaphragm. As your diaphragm moves up or down, SO SHOULD YOUR PELVIC FLOOR. When it is drawing up, it should be a contraction. And as it moves down, that’s an active relaxation.
Yes, your pelvic floor needs to do both. No, you shouldn’t be peeing yourself during exercise. Yes, tuning into the contraction AND relaxation of your pelvic floor will help.
3. MULTIFIDIS
The back of the canister. These muscles run from your tailbone up your spine and help support the back of your core corset. (Actually kind of looks like corset strings, amirite?) A lot of low back pain can stem from a weak multifidis. And if you have a tendency to arch your lower back in everyday life, work here.
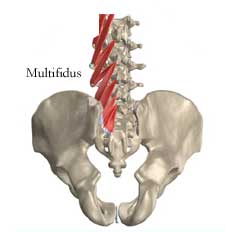
Meet your multifidis!
Those little muscles are the MOST IMPORTANT spinal stabilizers you have.
Learning to properly engage and strengthen your multifidis not only supports your spine (which is a pretty big deal btw), but it also controls how well, easily, and strongly you can move through your hips. You know, those joints that power most of your skating…
Also, if you’ve ever injured your spine and/or had it immobilized, chances are that your multifidis atrophied quite a bit. Research suggests it can atrophy up to 25% in the first week of spinal injury. And, remember, it’s the MAIN SPINAL SUPPORT so that’s a big deal.
The thing about the multifidis being so small is that we often don’t know HOW to engage it. Or even that it’s there at all — holding our spine straight and stabilizing our hips. Because it’s so small, your brain might have a hard time attaching to it. You can’t strengthen a muscle that your brain doesn’t know how to engage, so that biggest part of learning to engage your multifidis (and support/protect your spine) is getting your brain to recognize where it is.
And THEN contract it.
Here’s a pretty simple thought experiment/exercise you can try to start learning how to engage your multifidis:
- Lie on your side with your lower back in a neutral position (a gentle curve). This position will mimic the position you take to do an exercise like a clamshell.
- Imagine a line running across your back (through the multifidis) that connects to your sacroiliac crest — the high point on the back of your hip bones.
- Start taking deep, circumferential breaths. The kind that engages your diaphragm and pelvic floor.
- As you breathe, think about using the muscles lining your spine to draw the sacroilliac crests together in the back.
Hold each of these contractions for 3-5 seconds and try to repeat 6-8 times. This could easily become part of a pre-training day or pre-game warm-up as a way to get those muscles engaged and ready to support your spine.
This can be a difficult drill to master, so make sure to avoid:
- contracting your big glute muscles
- tilting or rotating the pelvis
- arching the spine
- drawing your legs up closer to your body
Need a big clue that you’re on the right track? It will feel easier to lift your leg (again, think clamshell) if you’re actively engaging your multifidis.
Once you’ve learned to get in touch with the muscle itself, you can start using exercises like the birddog to actively strengthen it.
4. TRANSVERSE ABDOMINIS (TVA)
The sides of the canister. These muscles are actually DEEP. The TVA wraps from your spine to a line of connective tissue under your sternum. It runs beneath all those glamour muscles and acts as the foundation of your core and force transfer.
The good news is that if you’ve been working on engaging and activating the other muscles in your core canister AND you’ve been working on deep, circumferential breathing — your TVA has been reaping all of the benefits.
Your TVA is one of the main support muscles for lumbopelvic stability. Essentially in charge of stabilization of your LOWER BACK and PELVIS so that your limbs can do their thing.
It’s the boning and support of your body’s built-in corset. The muscle fibers run horizontally connecting your lumbar spine and your pelvis.
DON’T CONFUSE YOUR TVA WITH YOUR OBLIQUES.
Obliques (and six-pack abs) are just packaging. Your TVA is the actual container. It’s the deep abdominal muscle that helps to contain your organs. And has a big part in shaping your waist. (If you care about that type of thing.)
The TVA is getting engaged and contracted and warmed-up and worked on in ALL of the drills I’ve shared so far this month.

But if you really want to work on your TVA, you can also add in my LEAST FAVORITE CORE EXERCISE — the hollow hold! Other awful variations include the hollow hang and the hollow rocker.
The goal here isn’t just to learn how to contract this specific muscle in your core. But to learn how to change the SIZE of your core canister by contracting this muscle.
Learning to draw in and hollow out your abdomen with your TVA is another step toward getting those core muscles to engage automatically when you’re blocking that jammer or driving into that wall or grabbing that star pass.
5. RECTUS ABDOMINIS
The front of the canister. The six-pack-ab glamour muscles. These arguably get the most attention, but they aren’t the most important. If all you’re doing for core strength is crunches, you’re hitting these muscles hard. But missing out on the rest.
The rectus abdominis is really just a supportive layer where a lot of your other core muscles overlap. Your six-pack (or lack thereof) is NOT an indication of a strong or weak core canister.
Remember, six-pack abs are just packaging. Not substance or support, not really.
4 Tips To Better Engage Your Core
- Your shoulders, ribs, and hips should be stacked when walking/lifting/skating. For some of us, this means actively working to tuck our pelvis forward and up to avoid overarching through the lower back.
- Work on that automated bracing and engagement through your core by EXHALING during the toughest part of an exercise. For example, as you stand from your squat or press to the top of your plank in a push-up. This will feel hard, but ultimately help!
- Check in on your breathing when you’re amped up. Actively move from breathing up in your shoulders down to full, circumferential breaths in your core. Your breaths will deepen as you throttle back down, so don’t breathe too deep, too soon.
- Practice kegels, sure. But also practice the opposite which is releasing and relaxing through your pelvic floor. They both have their place.
I know this is A LOT of information. Try not to get overwhelmed and start by practicing one exercise or breathing drill. The ability to engage, activate, brace, and relax your core WHILE BREATHING is a core (*rimshot*) ability of a strong athlete.
Get to practicing!
Want More?
If you’re interested in more exclusive content, access to my FREE resource library, and the slightly weird workings of my inner mind, you can sign up for the Iron Octopus Fitness email list HERE. Wherein I harass you weekly with all things intelligent cross training, mindset, and…other.